I would encourage you to go take a look at Shapways for farm equipment and tires. Shapways prints 3D models that customers have drawn up. Look at farm equipment in all scales because you can ask any of the shops if they would print it in HO scale. This is very easy for them most of the time to change scales within their drawings. There maybe the issue that it is too small for HO but if you look at some of the Z scale items I doubt it. Over the past year there has been a lot more models added and the site is getting easier to search than it used to be.
Pay attention to what material it is printed with and the fact that a lot of the models do not show a built model just the 3D rendering. Once you see a built model you will understand. "Smooth fine detail plastic" is smooth and "natural versatile plastic" has a sand paper texture but costs less. You can see the difference between some of the pictures. It is your choice how to have it printed most of the time. Pay attention to what scale you are looking at as scales larger than HO scale will cost less and N and Z will cost more to have it printed in HO.
Just do a search using Farm Equipment to start with. You will then go through builders pages to see what they have. There are some things from Europe that look interesting but need translation. There are some models that are listed as HO.
If you are scratch building the amount of tractor and implement tires that are out there is huge now. There are even a few motors now being printed like flat head V8, V6 and small diesels.
I wish that someone would do a 12hp Briggs and Stratton that I need for the Mayrath grain auger I want to build. The next thing would be a plain old 15" tire and rim. There was lots of equipment that used this type of tire. It was common to put 2nd hand questionable tires on certain things.
The pieces that I am most interested in and looking at are the thrashing machine, Ford 8N snow tractor, the bale elevator if it can be done in HO, some horses with harness, birds, some interesting older Gleaner combines, NH side delivery rake and combine headers.
I wish I could draw 3D because there are some other smaller things that I would like. I now have access to a laser cutter so there are some things like my diamond harrows and cabs for the JD 4010 tractors that I will get done using that. Yes I am cheating with the 40 series tractors for my era by a year.
Here are some links and by no means this is all of them but it will give you an idea and a start.
www.shapeways.com/shops/dennys3dtrucksandfarmacc
https://www.shapeways.com/shops/lazyffarmtoys
https://www.shapeways.com/shops/nvrr49?li=pb
https://www.shapeways.com/shops/tracmodel
https://www.shapeways.com/shops/modelsupplies
https://www.shapeways.com/shops/baldyloxdesigns
https://www.shapeways.com/shops/cb-customs-farm-models
https://www.shapeways.com/shops/verses
https://www.shapeways.com/shops/catzpaw-innovations
https://www.shapeways.com/shops/cb-s-designs
Saturday, 26 January 2019
Saturday, 19 January 2019
Grain Elevators Part 2 National
As I am working my way around my layout finishing the scenery from the small shelf up to Waldron. Waldron has two elevators a P&H and a National that I have to complete by adding the driveways and some other details. I thought I would give a post on these as they get completed. I finished the CAD drawings for the driveways.
Here is a picture of what they are or have been for a while. I didn't get the rest of the building built because at the time I at least wanted the main body modelled so that a train passed something. You see that the National has a square false front which really was not that common. The National decal was custom made and the decal for the P&H came from a Microscale set. Other details of note are the wood roof hatches. Agents would shovel the dust that accumulated on the floor at the top of the leg where the distributor was out this opening. On the National there are some singles that have been patched. I put a piece of tape over that section of shingles before I air brushed the weathering on the rest of the shingles. The body colour is light iron oxide which was used a lot because it was cheap and held its colour well. To paint an elevator today it would cost $$$$. This scene is loosely based on Ernfold Saskatchewan were the track went through a similar kind of cut so the entry to the driveway was at ground level which is not very typical in Western Canada but is more common in the US.

Here is a picture of the back side. The only disadvantage to having the elevators set up like this is uncoupling cars can be a bit of a challenge but it does put the driveways next to the isle. You can see the folding platform that is at door level with the car. The rail above that is the track for the doors.


Here are the pieces laid out after being cut out. Going clock wise from the top left. The paper cut out for the back hopper, the black piece is the 4'x8' chalk board, the driveway floor with the metal slats installed over the unloading pit, the doors for driveway entry at both ends, the roof for the little extension next to the scale and the driveway roof panel with the paper with the shingles line glued to it. The same is on the little roof. The stick on the little roof I glued on so I had a handel when I was spraying the styrene with glue befor attaching the paper.


In the next post I will show the painted, shingled and partially assembled parts along with other details.
Here is a picture of what they are or have been for a while. I didn't get the rest of the building built because at the time I at least wanted the main body modelled so that a train passed something. You see that the National has a square false front which really was not that common. The National decal was custom made and the decal for the P&H came from a Microscale set. Other details of note are the wood roof hatches. Agents would shovel the dust that accumulated on the floor at the top of the leg where the distributor was out this opening. On the National there are some singles that have been patched. I put a piece of tape over that section of shingles before I air brushed the weathering on the rest of the shingles. The body colour is light iron oxide which was used a lot because it was cheap and held its colour well. To paint an elevator today it would cost $$$$. This scene is loosely based on Ernfold Saskatchewan were the track went through a similar kind of cut so the entry to the driveway was at ground level which is not very typical in Western Canada but is more common in the US.

Here is a picture of the back side. The only disadvantage to having the elevators set up like this is uncoupling cars can be a bit of a challenge but it does put the driveways next to the isle. You can see the folding platform that is at door level with the car. The rail above that is the track for the doors.

Here is what my cad drawing for the driveway looks like. Some of the parts on the right are for an extension that you see on some driveways and will be on my next elevator. My drawings are not meant to be professional as they are not for sale.

Here are the pieces laid out after being cut out. Going clock wise from the top left. The paper cut out for the back hopper, the black piece is the 4'x8' chalk board, the driveway floor with the metal slats installed over the unloading pit, the doors for driveway entry at both ends, the roof for the little extension next to the scale and the driveway roof panel with the paper with the shingles line glued to it. The same is on the little roof. The stick on the little roof I glued on so I had a handel when I was spraying the styrene with glue befor attaching the paper.

This picture shows the outside wall for the driveway with the man door and extension installed, the back hopper and the template that it was cut out from, the front leg from the unloading pit, the end walls of the driveway and the center section that has the hole for the leg and the walls for the bins.


So I drew out the hopper in CAD, printed it, cut it out and glued it to .01 styrene sheet and cut it out. Then folded the hopper and glue it together one side at a time. I also then added a scale 12" high extension to the top of the hopper that is not shown. I just cut out another paper to show what it would have looked like. The one that was glued to the styrene is lost when I wash it off.

In the next post I will show the painted, shingled and partially assembled parts along with other details.
Friday, 4 January 2019
"Model Railroads" the book 1954
My friend Brian Small gave this book Model Railroads that was printed in 1954 which would have been nice to have a long time ago. Brian thought I would find it interesting and a good fit to have a book writen close to my era. Having said that, if I had seen it for sale I most likely would have dismissed it as being too old and maybe plain. Here is a picture of the cover and on the spine the only words are Model Railroads. The copyright is 1954 and the Library of Congress number is 54-12466.

The part that amazes me about this book is that the operations portion of the book could have been written in the last 10 years. It is amazing to see the vision Frank Ellison had for modelling operations that advanced back then. The only thing that would give this books date away to the reader would be some of the rolling stock and some of the scenery techniques.
I guess my point is that if I had had this book I could have skipped a lot of the other reading that I have done around track planing and operations. I also could have skipped the fatal error that just about everyone makes by not paying attention to operations. We really have not invented anything new over that time period, Frank Ellison really had a grasp of this topic with his diagrams, text and pictures. It is too bad that it is not available as an ebook or PFD because every person who is starting a layout or rebuilding one should get to read this book. It did use some reprinted material from Model Railroader magazines from 1949, 1950 and 1951. It is another gem that I happen to have in my collection of books. I have started putting it out during operations sessions for ops to look at during down time.

I guess my point is that if I had had this book I could have skipped a lot of the other reading that I have done around track planing and operations. I also could have skipped the fatal error that just about everyone makes by not paying attention to operations. We really have not invented anything new over that time period, Frank Ellison really had a grasp of this topic with his diagrams, text and pictures. It is too bad that it is not available as an ebook or PFD because every person who is starting a layout or rebuilding one should get to read this book. It did use some reprinted material from Model Railroader magazines from 1949, 1950 and 1951. It is another gem that I happen to have in my collection of books. I have started putting it out during operations sessions for ops to look at during down time.
Saturday, 29 December 2018
Sources for building plans
This is just a quick post. Since I scratch build a lot I have always been on the look out for building plans. These apply to my era but some of them can apply to new more resent eras. Now not all these plans give you every measurement but you can easily fill in any blanks if needed. I redrawn some plans from these sites, I just haven't had the time to build them yet. They will get built as I, work my way through the rest of my scenery.
North Dakota State University Has a lot of farm building, tools, livestock equipment, grain and some house plans. You will notice in one column the year the plan can out.
Colorado State University This also has a lot of farm building, tools, livestock equipment, grain and some house plans. You will again notice in one column the year the plan came out.
Sears House Plan Archives This one is interesting if you are looking for older house plans plus you get some history about Sears also.
Shorpy Photos are just really nice pictures that can show you details of older eras that you would not normally get to see.
Saturday, 22 December 2018
Farm Details 2 JD Combine

John Deere then released the model 25 from 1952-1955 and then the model 30 from 1956-1961. The 30 combines are slightly different as they can have a pickup and have a table auger with enclosed feeder house.
In this era John Deere also released the model 65 in 1958 but there are no HO scale models of this machine currently available.
During this era John Deere also released 3 other self propelled models. The 55 1947-1959. The 45 1954-59. The 95 round back 1958-59. There are no HO scale models of these at this time. There are models in S scale so you could build a model taking measurements off of one of these.
Finding historical information on farm equipment is not very easy. Finding info on tractors is much easier. All of the above information applies to what you would have seen on the Canadian prairies. I am just scratching the surface of this topic as there are other manufactures such as Massey Harris which was a Canadian company that was a power in combines.
GHQ has some other nice models - as you will see on their page - that happen to represent real life machines. North American farm equipment in HO scale of any kind is hard to find. To build this combine you just have to remove a little bit of flash from the metal parts and glue it together using CA or 5 min epoxy. The reels are etched brass and look really good but you have to take care working with them. I painted some of the drive belts black which takes a steady hand. I have a very small brush, you could also try using a tooth pick to paint with. The feeder house on this combine is canvas with wood slats. same as swather canvas. It is a light grey colour when new and the slats were unpainted wood. I had the decals custom printed as none come with the model. The model dosen't come with the straw spreader so I am considering building one. Because it is a 6' straight through I doubt the speader did much. I have added the straw deflector and the table lift arm though. The color of the reel bats are hard to tell as I only have black and white pictures - they may have been painted green. You can see in the John Deere add above they show reels and bats painted yellow. I painted mine plain wood with a little green colour as much of the paint would have been worn off by 1959.

Here are some pictures of the 12-A that is in Camrose at the museum. This has tines along with wood bats on the reels. It also has the independent ULC motor to drive it. The other thing of note when looking at this combine is that the combine is set to the left of the hitch. If you look at the hitch of a JD 65 the combine is on the right side of the hitch looking at it from the back. This change of rotation from going counter clockwise to clockwise around a field occurred on other towed equipment in the 40's and 50's. You can find lots of pictures and a few videos on the internet of any of these combines. I just can't post them because I do not have permisions.


In this picture you can see where the motor is mounted on the left side in the picture. The hitch is swung over to the transport position. The canvas feeder is not installed.


This John Deere add shows the model 30 with a motor drive. Note the pickup and table auger.

Sunday, 25 November 2018
Scenery part 2
I am now working on the scenery from the edge of the small shelf up to Waldron which is on the right side of my layout drawing. The buildings will be covered in different posts on there own.
This is what it looks like at the start and how it has been for a while.
In Oct I added the page wire fence on both sides of the right-of-way and painted the first coat on the telegraph poles to make them look aged. Some have the white paint on the insulators. They will get translucent green next to highlight the glass insulators.
That is a diamond harrow draw bar in the field at the back. I have not built the harrows yet but have them drawn in CAD. I am thinking of building a pull type rock picker to add to the scene also. I have made the drawings for it.
You can see the white sign for Waldron, the small one further back is the whistle sign and the one closer to the bridge is the flanger sign.
I also have just painted the backdrop. This field has just been seeded.
The field in the front will be stubble that is being summer fallowed.
There is a barbed wire fence that will get added coming out to the front. And one going to the back on the other side of the track.

This shows where the oil pump jack is going to go. Not really a Saskatchewan thing but I spent a lot of my career in the oil patch be it in large plants. But back in 1978 a farm kid from Sask worked for a year for a company out of Nisku Alberta that repaired these and we traveled all over the province. The steel bins are just resting there for now. These bins model 1650 bushel 5 ring Westeel or Rosco bins. They are actually Rix N scale bins that scale out really well. If you take 1 row of rings off you would have a 1350 and if you add a row you would have a 1950.
I have painted in the road on the back drop. The monument and sign just to the right of the bins is where the last spike went in back in 2010. You can also see the flanger sign.

Also painted some more back drop and built the snow fence in Oct
The elevators have to be finished, an anex for one or both and a coal shed. I find it interesting in this photo that the road at the back that is painted actually goes in the other direction at about the same angle when you look at it straight on

This photo shows how far this series of posts will go. The rectangle drawn on the scenery is where the station is going. This will be an E Class GTP. That is a passing siding on the right.

The 2 red bins are scratch built and represent plywood bins that were relatively common and hold 1350 bushels. You can now see how the painted road has changed to the way it was painted, although the angle is a little steeper than it looks straight on.
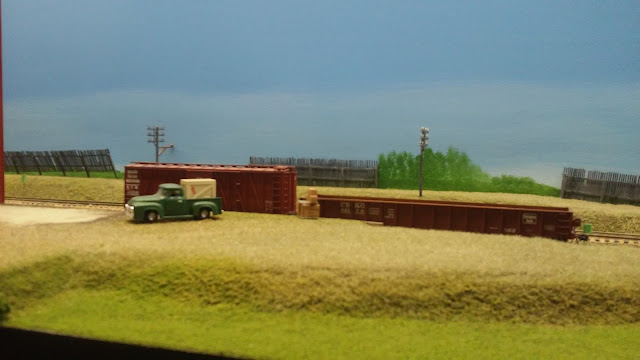
 There is a loading platform where the boxcar is sitting. The thing at the coupler on the gondola is the brakes. It is a pin with green tape on it. If a car will not sit still the crew can apply a brake. Still need to add the wheel stops to the ends of the rail. The idea is there will be a steel scrap pile where the gondola is currently sitting. Also still need fence on the right hand side of the right-of-way.

Here is closer look at the snow fence. It is all styrene with 1x4 and 2x6. The posts are 6x8. The grass it seems to photograph really brown so I will have to fix that. It is a light green but you just do not see it.

I will continue to add posts until this piece of scenery is complete.
This is what it looks like at the start and how it has been for a while.
In Oct I added the page wire fence on both sides of the right-of-way and painted the first coat on the telegraph poles to make them look aged. Some have the white paint on the insulators. They will get translucent green next to highlight the glass insulators.
That is a diamond harrow draw bar in the field at the back. I have not built the harrows yet but have them drawn in CAD. I am thinking of building a pull type rock picker to add to the scene also. I have made the drawings for it.
You can see the white sign for Waldron, the small one further back is the whistle sign and the one closer to the bridge is the flanger sign.
I also have just painted the backdrop. This field has just been seeded.
The field in the front will be stubble that is being summer fallowed.
There is a barbed wire fence that will get added coming out to the front. And one going to the back on the other side of the track.

This shows where the oil pump jack is going to go. Not really a Saskatchewan thing but I spent a lot of my career in the oil patch be it in large plants. But back in 1978 a farm kid from Sask worked for a year for a company out of Nisku Alberta that repaired these and we traveled all over the province. The steel bins are just resting there for now. These bins model 1650 bushel 5 ring Westeel or Rosco bins. They are actually Rix N scale bins that scale out really well. If you take 1 row of rings off you would have a 1350 and if you add a row you would have a 1950.
I have painted in the road on the back drop. The monument and sign just to the right of the bins is where the last spike went in back in 2010. You can also see the flanger sign.

Also painted some more back drop and built the snow fence in Oct

The elevators have to be finished, an anex for one or both and a coal shed. I find it interesting in this photo that the road at the back that is painted actually goes in the other direction at about the same angle when you look at it straight on

This photo shows how far this series of posts will go. The rectangle drawn on the scenery is where the station is going. This will be an E Class GTP. That is a passing siding on the right.

The 2 red bins are scratch built and represent plywood bins that were relatively common and hold 1350 bushels. You can now see how the painted road has changed to the way it was painted, although the angle is a little steeper than it looks straight on.


Here is closer look at the snow fence. It is all styrene with 1x4 and 2x6. The posts are 6x8. The grass it seems to photograph really brown so I will have to fix that. It is a light green but you just do not see it.

I will continue to add posts until this piece of scenery is complete.
Friday, 16 November 2018
Scenery part 1
I am currently working on scenery and thought I would take you along as I am working on it. This will be a series of posts.
This narrow shelf is on the right had side of my layout drawing. It is 5' long and 4.5" wide. The scenery on this was completed in Sept. I painted the back drop, added the fence to the right-of-way, added the static grass, weathered the road bed and added a piece of snow fence. The bare spot at the end is the start of the next piece of scenery to Waldron. There is a strip of Plexiglas on the left to keep things off the floor. The shelf was built this small so there would be enough room to move things from the stairs to the other room.
The page wire fence is some window screen cut 4 scale feet high. It is the closest thing I could find. The posts CN used were ceder mine are balsa stained to age them. I just cut the posts strips out of a sheet and then chopped them to length. The vast majority of the right-of-way had this type of fence because when these lines were built the vast majority of farmers had livestock. The barbed wire fence is styrene .02-.04 rod painted wood brown. The barbed wire is grey coloured thread. I ended up picking this colour as you can see it so it get bumped less.

I can't remember who made the telegraph poles. I first drag the main pole with 80 grit sandpaper to give the plastic some wood texture. Next I weather them with white paint and black fabric dye see the link weathered wood on how to weather plastic to look like old wood. I then paint the insulators white acrylic and then paint them with a translucent green from Gallery Glass...... The last step is to paint the support braces a steel or dark oxide colour.

This is what they look like from start to finish


This looking back the other way. The farm is around the corner. You can see the whistle and flanger signs on the right side. The snow fence is between the 2 signs.

The bridge was covered in it own post CNR Wood trestle part 2


This narrow shelf is on the right had side of my layout drawing. It is 5' long and 4.5" wide. The scenery on this was completed in Sept. I painted the back drop, added the fence to the right-of-way, added the static grass, weathered the road bed and added a piece of snow fence. The bare spot at the end is the start of the next piece of scenery to Waldron. There is a strip of Plexiglas on the left to keep things off the floor. The shelf was built this small so there would be enough room to move things from the stairs to the other room.
The page wire fence is some window screen cut 4 scale feet high. It is the closest thing I could find. The posts CN used were ceder mine are balsa stained to age them. I just cut the posts strips out of a sheet and then chopped them to length. The vast majority of the right-of-way had this type of fence because when these lines were built the vast majority of farmers had livestock. The barbed wire fence is styrene .02-.04 rod painted wood brown. The barbed wire is grey coloured thread. I ended up picking this colour as you can see it so it get bumped less.


This is what they look like from start to finish


This looking back the other way. The farm is around the corner. You can see the whistle and flanger signs on the right side. The snow fence is between the 2 signs.

The bridge was covered in it own post CNR Wood trestle part 2


The finished scenery

Wednesday, 7 November 2018
Using JMRI for Operations
I thought this was an appropriate time to do a post on this topic as I have just recently done a tuneup on on my JMRI operations with some help from the JMRI users group and Dan in particular. There were a few things that I needed to understand better to improve car movements. This extra knowledge will enable me to help others also. I have been using JMRI since 2010 and it has worked well, I am just trying to make it run better in the prototypical way that I prefer. I also use TT & TO to run my operation sessions. When I started out I used car cards but found this to be a bit cumbersome and so I switched to JMRI operations which handles all my car movements. I never did get to the part of having to build all the card holders and such. Like most things in each system has a few points that may result in compromise. Living in the Edmonton area where we have 10-12 layouts doing operation sessions that use both methods there are always conversation about it. I also use JMRI Decoder Pro and can't imagine running without it - I will cover this topic in another short post. None of of my comments in this post are meant as a slag against how anyone else runs their operations.
The great thing about JMRI is that it is open source so you do not need to purchase it to get to play with any of its features. I use other open source programs like Libre Office, LibreCad, and Gymp which are all open source programs that are free.
It does take a bit of time to set it up very similar to creating all those car cards. The JMRI site gives you access to a very well written manual. Now I know most of us are men and do not need to read manuals "hahaha" but you do need to read this one, most likely a couple of times before you start. and a couple of times after that.
It does take a little maintenance but so does flipping all those car cards before each session. The purpose in using any computer program is to make repetitive tasks much easier and it does just that.
JMRI Operations generates manifests and switch lists for trains that are printed out on 1 or 2 pages, which is easier for new operators to use since they have a sheet that gives them instruction on what to do. There are even switch lists for the yard operators. They do not have to handle a stack of cards which for a 30 car train is about an 1 1/4 " thick and for the yard ops this can be huge. For example my yard is on the smaller side but still holds 70 cars. The other thing this does is tell operators exactly what track the cars are going to as you can see below in Melville. Below is a what a manifest for through freight 715 looks like. Rivers is in east staging and Watrous is west staging. The one thing that JMRI operations doesn't do well is block cars so I use this manifest to block the cars before a session starts. This is done in staging.
The first paragraph is mostly instructions I have added. This way even new ops have this with them all the time they are on this train.
Rivers is really just showing what cars and power 715 is leaving staging with and what track their train will be on. In this case the train will be on track 6.
Next it shows places they will pass and that there is no work there.
Then we get to Melville and it shows what pulls and spots there are and what tracks the cars are going to or coming from. The yard master will usually sort the pull cars ahead of time to a track and if busy the yard master can have the train drop all the cars to track 2 to keep things moving and move them later.
Watrous shows what cars you have and what track you are going to in staging. All my trains depart and arrive on the same track in staging. Each track just has different virtual names. Upon arriving in staging the train is reversed on the loop and then stored on its track. It will leave Watrous next trip as 716 east bound.
Manifest for train (715) West Through Freight
Valid 6/21/1959 17:29 (Tuesday)
At Rivers get your clearance, train orders and manifest
Drop cars to Track 2 at Melville and pick up cars from Track 3 West.
Or as instructed by Yard Master
At Melville take on fuel. Steamers can also take on water.
Get your clearance and train orders 10min crew change
Scheduled work at Rivers, departure time 07:00
[ ] Pick up CN 9030 F7A from Track 6
[ ] Pick up CN 9037 F7B from Track 6
[ ] Pull CN 478548 Boxcar 40' E<mpty> from Track 6 -> Melville
[ ] Pull LNE 352 Boxcar 40' E<mpty> from Track 6 -> Melville
[ ] Pull CN 500799 Boxcar 40' E<mpty> from Track 6 -> Melville
[ ] Pull CN 485338 Boxcar 40' E<mpty> from Track 6 -> Melville
[ ] Pull CN 483916 Boxcar 40' E<mpty> from Track 6 -> Melville
[ ] Pull CN 544559 Boxcar 40' L< Boxes> from Track 6 -> Melville
[ ] Pull NYC 168265 Boxcar 40' L<Supliment> from Track 6 -> Melville
[ ] Pull GM&O 75003 Flatcar 40' L<Ties> from Track 6 -> Melville
[ ] Pull GTW 591599 Boxcar 50' L<Auto> from Track 6 -> Melville
[ ] Pull CN 479667 Boxcar 40' E<mpty> from Track 6 -> Melville
[ ] Pull CN 500899 Boxcar 40' E<mpty> from Track 6 -> Melville
[ ] Pull CN 526844 Boxcar 40' E<mpty> from Track 6 -> Melville
[ ] Pull CN 543790 Boxcar 40' E<mpty> from Track 6 -> Melville
[ ] Pull NYC 712675 Gondola 52' E<mpty> from Track 6 -> Watrous
[ ] Pull CN 78934 Caboose 36' from Track 6 -> Watrous
Train departs Rivers Westbound with 15 cars, 792 feet, 830 tons
No work at Cana Jct
No work at Atwater
No work at Bangor Jct
No work at Waldron
Scheduled work at Melville, arrival time 07:30
[ ] Spot CN 478548 Boxcar 40' E<mpty> to Track 2
[ ] Spot LNE 352 Boxcar 40' E<mpty> to Track 2
[ ] Spot CN 500799 Boxcar 40' E<mpty> to Track 2
[ ] Spot CN 485338 Boxcar 40' E<mpty> to Track 2
[ ] Spot CN 483916 Boxcar 40' E<mpty> to Track 2
[ ] Spot CN 544559 Boxcar 40' L< Boxes> to Track 2
[ ] Spot NYC 168265 Boxcar 40' L<Supliment> to Track 2
[ ] Spot GM&O 75003 Flatcar 40' L<Ties> to Track 2
[ ] Spot GTW 591599 Boxcar 50' L<Auto> to Track 2 Ensure End Door Is Facing Ramp
[ ] Pull CN 110473 Hopper 40' E<mpty> from Track 3 West -> Watrous
[ ] Pull CN 533503 Boxcar 40' E<mpty> from Track 3 West -> Watrous
[ ] Pull CN 143201 Gondola 52' E<mpty> from Track 3 West -> Watrous
[ ] Spot CN 479667 Boxcar 40' E<mpty> to Track 5 Mixed East
[ ] Spot CN 500899 Boxcar 40' E<mpty> to Track 5 Mixed East
[ ] Spot CN 526844 Boxcar 40' E<mpty> to Track 5 Mixed East
[ ] Spot CN 543790 Boxcar 40' E<mpty> to Track 6
Train departs Melville Westbound with 5 cars, 354 feet, 372 tons
No work at Burmingham Jct
Scheduled work at Watrous, arrival time 21:12
Reverse Train Before parking
[ ] Set out CN 9030 F7A to Track 6
[ ] Set out CN 9037 F7B to Track 6
[ ] Spot CN 110473 Hopper 40' E<mpty> to Track 6
[ ] Spot CN 533503 Boxcar 40' E<mpty> to Track 6
[ ] Spot CN 143201 Gondola 52' E<mpty> to Track 6
[ ] Spot NYC 712675 Gondola 52' E<mpty> to Track 6
[ ] Spot CN 78934 Caboose 36' to Track 6
Train terminates in Watrous
The manifest makes it easier for ops that are new to operations as everything is explained. There is also a switch list for the yard that shows what cars they need to spot and pull from local industries. I also have a train lineup sheet that the yard master can look at which tells what trains are coming including the extras which are not on the time table. I don't normally have a dedicated dispatcher except for me so it works well on my layout. The biggest thing I am trying to achieve is a less stressful atmosphere for new people to operate in.
In another post we will look at the paper work I use during operation sessions.
The great thing about JMRI is that it is open source so you do not need to purchase it to get to play with any of its features. I use other open source programs like Libre Office, LibreCad, and Gymp which are all open source programs that are free.
It does take a bit of time to set it up very similar to creating all those car cards. The JMRI site gives you access to a very well written manual. Now I know most of us are men and do not need to read manuals "hahaha" but you do need to read this one, most likely a couple of times before you start. and a couple of times after that.
It does take a little maintenance but so does flipping all those car cards before each session. The purpose in using any computer program is to make repetitive tasks much easier and it does just that.
JMRI Operations generates manifests and switch lists for trains that are printed out on 1 or 2 pages, which is easier for new operators to use since they have a sheet that gives them instruction on what to do. There are even switch lists for the yard operators. They do not have to handle a stack of cards which for a 30 car train is about an 1 1/4 " thick and for the yard ops this can be huge. For example my yard is on the smaller side but still holds 70 cars. The other thing this does is tell operators exactly what track the cars are going to as you can see below in Melville. Below is a what a manifest for through freight 715 looks like. Rivers is in east staging and Watrous is west staging. The one thing that JMRI operations doesn't do well is block cars so I use this manifest to block the cars before a session starts. This is done in staging.
The first paragraph is mostly instructions I have added. This way even new ops have this with them all the time they are on this train.
Rivers is really just showing what cars and power 715 is leaving staging with and what track their train will be on. In this case the train will be on track 6.
Next it shows places they will pass and that there is no work there.
Then we get to Melville and it shows what pulls and spots there are and what tracks the cars are going to or coming from. The yard master will usually sort the pull cars ahead of time to a track and if busy the yard master can have the train drop all the cars to track 2 to keep things moving and move them later.
Watrous shows what cars you have and what track you are going to in staging. All my trains depart and arrive on the same track in staging. Each track just has different virtual names. Upon arriving in staging the train is reversed on the loop and then stored on its track. It will leave Watrous next trip as 716 east bound.
Manifest for train (715) West Through Freight
Valid 6/21/1959 17:29 (Tuesday)
At Rivers get your clearance, train orders and manifest
Drop cars to Track 2 at Melville and pick up cars from Track 3 West.
Or as instructed by Yard Master
At Melville take on fuel. Steamers can also take on water.
Get your clearance and train orders 10min crew change
Scheduled work at Rivers, departure time 07:00
[ ] Pick up CN 9030 F7A from Track 6
[ ] Pick up CN 9037 F7B from Track 6
[ ] Pull CN 478548 Boxcar 40' E<mpty> from Track 6 -> Melville
[ ] Pull LNE 352 Boxcar 40' E<mpty> from Track 6 -> Melville
[ ] Pull CN 500799 Boxcar 40' E<mpty> from Track 6 -> Melville
[ ] Pull CN 485338 Boxcar 40' E<mpty> from Track 6 -> Melville
[ ] Pull CN 483916 Boxcar 40' E<mpty> from Track 6 -> Melville
[ ] Pull CN 544559 Boxcar 40' L< Boxes> from Track 6 -> Melville
[ ] Pull NYC 168265 Boxcar 40' L<Supliment> from Track 6 -> Melville
[ ] Pull GM&O 75003 Flatcar 40' L<Ties> from Track 6 -> Melville
[ ] Pull GTW 591599 Boxcar 50' L<Auto> from Track 6 -> Melville
[ ] Pull CN 479667 Boxcar 40' E<mpty> from Track 6 -> Melville
[ ] Pull CN 500899 Boxcar 40' E<mpty> from Track 6 -> Melville
[ ] Pull CN 526844 Boxcar 40' E<mpty> from Track 6 -> Melville
[ ] Pull CN 543790 Boxcar 40' E<mpty> from Track 6 -> Melville
[ ] Pull NYC 712675 Gondola 52' E<mpty> from Track 6 -> Watrous
[ ] Pull CN 78934 Caboose 36' from Track 6 -> Watrous
Train departs Rivers Westbound with 15 cars, 792 feet, 830 tons
No work at Cana Jct
No work at Atwater
No work at Bangor Jct
No work at Waldron
Scheduled work at Melville, arrival time 07:30
[ ] Spot CN 478548 Boxcar 40' E<mpty> to Track 2
[ ] Spot LNE 352 Boxcar 40' E<mpty> to Track 2
[ ] Spot CN 500799 Boxcar 40' E<mpty> to Track 2
[ ] Spot CN 485338 Boxcar 40' E<mpty> to Track 2
[ ] Spot CN 483916 Boxcar 40' E<mpty> to Track 2
[ ] Spot CN 544559 Boxcar 40' L< Boxes> to Track 2
[ ] Spot NYC 168265 Boxcar 40' L<Supliment> to Track 2
[ ] Spot GM&O 75003 Flatcar 40' L<Ties> to Track 2
[ ] Spot GTW 591599 Boxcar 50' L<Auto> to Track 2 Ensure End Door Is Facing Ramp
[ ] Pull CN 110473 Hopper 40' E<mpty> from Track 3 West -> Watrous
[ ] Pull CN 533503 Boxcar 40' E<mpty> from Track 3 West -> Watrous
[ ] Pull CN 143201 Gondola 52' E<mpty> from Track 3 West -> Watrous
[ ] Spot CN 479667 Boxcar 40' E<mpty> to Track 5 Mixed East
[ ] Spot CN 500899 Boxcar 40' E<mpty> to Track 5 Mixed East
[ ] Spot CN 526844 Boxcar 40' E<mpty> to Track 5 Mixed East
[ ] Spot CN 543790 Boxcar 40' E<mpty> to Track 6
Train departs Melville Westbound with 5 cars, 354 feet, 372 tons
No work at Burmingham Jct
Scheduled work at Watrous, arrival time 21:12
Reverse Train Before parking
[ ] Set out CN 9030 F7A to Track 6
[ ] Set out CN 9037 F7B to Track 6
[ ] Spot CN 110473 Hopper 40' E<mpty> to Track 6
[ ] Spot CN 533503 Boxcar 40' E<mpty> to Track 6
[ ] Spot CN 143201 Gondola 52' E<mpty> to Track 6
[ ] Spot NYC 712675 Gondola 52' E<mpty> to Track 6
[ ] Spot CN 78934 Caboose 36' to Track 6
Train terminates in Watrous
In another post we will look at the paper work I use during operation sessions.
Tuesday, 30 October 2018
CNR Wood Trestle Part 2
This was a relatively easy build that was done in 3 days. I scratch built this trestle from the CNR plans that came in a bundle from CN Lines. The bridge is a wood deck, ballasted and is 43' long. I wanted one these bridges because short bridges like this one are so common in the prairies, although there are many different types. They usually have a slough around it and cross a small creek. This was a feature I could add to this section as the shelf is only 4 1/2" wide and helps set the scene and gives it something interesting. This is built from scale wood from Northeastern and Kappler. No real tips or tricks here just a straight forward build using the drawings and some pictures that I had taken of similar bridges. I used the pictures for details that the plans didn’t show. I partially drew it out in Cad so I knew what it would take to cover the span. Then I created other drawings in Cad to use as gluing templates. The wood was all stained before I started the build. I then taped wax paper over the printed paper so the wood glue would not stick. The deck was made in this fashion. The top deck and end bulkheads were made board by board. Once the deck was done I added the dowel posts and then set it in place. The spots were marked where the posts touched the scenery by putting lipstick on the bottom of the posts. I then drill holes in these spots for the posts to slip into. The posts were intentionally cut longer and were marked and trimmed if needed. The nut bolt washers are from Tichy. The ties are mainline Central Valley. I then added the guard rails down the middle using code 70 ME rail and glued them in place. The mainline rails are ME code 83. I regrettably do not have any pictures during the build. The posts are just doweling I had around. It is a tough place to take pictures because of lighting and the Plexiglas that is on the front of the shelf to protect equipment from falling to the floor.


Friday, 19 October 2018
Back Drop Painting
Everyone who has ever built a layout has had to overcome that one thing they don't enjoy or maybe even dread. That may be bench work, electrical, scenery, laying track, scratch building or putting kits together. The thing I dreaded most was having to paint my back drops. I procrastinated as long as possible which turned into about 9 years. My version of drawing a person is a collection of 5 straight lines, 3 circles and a curve. If I had been an artist I may never have gotten into model railway modelling as painting would be an enjoyable hobby on it's own. So that being said I had to find a way to overcome the fear of painting backdrops.

I then went though the same process with Warren who's layout is Alberta Pacific Railway (I don't have a picture of his backdrop but trust me it looks just as good). I also admired the layout at the EMRA in Edmonton. But I was still not feeling it. All of these layouts are so well done and the guys were very supportive.
My first work around not painting was to look at photo murals but I was not going to get what I wanted easily. I was also not 100% sure what was going where and it was going to be very expensive by the time I was done. So I started by painting the blue sky with some white blended in to lighten it up at the horizon, this was easy enough and was completed in 2007 after I had laid down the basic scenery profile. It stayed like this until 2012.

I knew that this was never going to keep me happy so in 2012 I had my first attempt at painting clouds behind my town site. This space is 3' deep and has a bit longer reach to the corners. I also realized that I was going to have to figure out how to paint through the corners. Awwghh more problems. It was always in the back of my mind that this was going to have to be completed and I was going to run out of time as I wanted to start working on the town.

As you can see the clouds looked ok but I felt they needed to look better. So I began to research on how to paint clouds better, thinking that might be all I required. At the same time that I was looking at clouds I was also looking at other parts of the scenery in some pictures that I had taken. I realized that on the prairies I would most likely only have to paint things about 3-4" high because the prairies are mostly flat. My other big fear was the painting of the 2 coulees, and a couple of low spots behind bridges where there are more angles and the need for perspective to give depth. I knew this would be difficult. I watched You Tube videos, got a couple of books from the library and looked at hundreds of pictures that I had taken or saved from the internet. My confidence grew as I bought brushes and acrylic paint in colours that I learned I would need. My daughters small easel worked well to hold inexpensive Bristol board, which I used to practice painting landscapes on.
By early 2016 I had considered more work arounds, I thought if I planted lots of trees against the back drop I would not have to paint anymore. So I amassed some trees and started planting them to give it a try. I soon discovered that this was going to take up a lot of space and in one spot I have a shelf that is only 4 1/2" wide and the trees would infringe on the track. Agh.... In Nov 2016 I started painting some better clouds. Which I was happy enough with and it was not really that difficult once I got going.

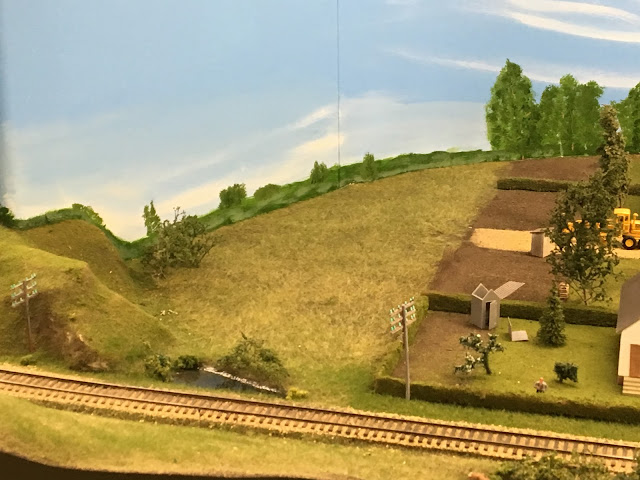
The next big move was to paint landscape, so I started with the hardest first, in the furthest part of the layout, which is slightly behind the TV where the track goes through the wall. That went well and then I moved on up the line to the first coulee. Now if I had done this earlier I would not have had to work around the bridge but this also went well. As I was going along I would fluke in to some shading and gain some more understanding. Oh... the hole in the wall to staging is just the other side of the last telegraph pole. The rest of the painting in all of the following pictures was done between Dec 2016 and Mar 2017


Next I decided to go to work behind the town, the farm and another coulee behind my wood trestle. I needed to finish this section as this was going to be the area that I was going to use for my NMRA Scenery AP. I was still learning little things as I went along. I stay away from detail mostly because it is one thing to paint using an easel, right in front of you, and another having to reach back to the wall. These next pictures show the painting as it progressed, not the finished scene.

The seam you see in the middle of this picture is how I did my corners. They are all curved by gluing Bristol board on to the wall in a curve into the corner. This worked really well and has stood up for 11 years so far. When you see it in person you really don't see the seam. Thus I have no 90* corners.


This next video is of the completed scene from the town to the farm.
So this is what I have learned through this process.
-that I wish I had not put this off for so long
-in the end it was no more scary than when I installed my first decoder back in 2006
-it took about the same amount of research as I put in to the detailing of cars and engines
-you really only need a few brushes and not that may colours of paints (12)
-I have to be in the mood to do it, but this applies to lots of things for me. If I am in the mood it usually goes easy. This is maybe a little more intense since you have to engage your artistic side.
-none of this painting will equal that of Max Jacquard's but then my whole layout is not museum quality either, so that's ok.
-I now paint a short piece and then do most of the scenery in front. This way it will look different as you go along and you have time to think about it.
I started out by asking my friend Norman Skretting how he managed to paint the backdrops on his CN Clearwater Sub layout which is set in interior BC with low mountains. Norman was very supportive and told me you just lay down some sky and then just start adding the hills, a little shading here and there blending it in to the scenery. You can do most of this with a 1" paint brush and a couple of other smaller brushes to paint trees. Norman doesn't claim to be an artist but this was all very helpful. But I still had very little confidence. So Norm and I had this conversation a few times before I felt brave enough to paint. The picture below is a sample of some of Norman's backdrop. Looks pretty good to me.

I then went though the same process with Warren who's layout is Alberta Pacific Railway (I don't have a picture of his backdrop but trust me it looks just as good). I also admired the layout at the EMRA in Edmonton. But I was still not feeling it. All of these layouts are so well done and the guys were very supportive.
My first work around not painting was to look at photo murals but I was not going to get what I wanted easily. I was also not 100% sure what was going where and it was going to be very expensive by the time I was done. So I started by painting the blue sky with some white blended in to lighten it up at the horizon, this was easy enough and was completed in 2007 after I had laid down the basic scenery profile. It stayed like this until 2012.

I knew that this was never going to keep me happy so in 2012 I had my first attempt at painting clouds behind my town site. This space is 3' deep and has a bit longer reach to the corners. I also realized that I was going to have to figure out how to paint through the corners. Awwghh more problems. It was always in the back of my mind that this was going to have to be completed and I was going to run out of time as I wanted to start working on the town.

As you can see the clouds looked ok but I felt they needed to look better. So I began to research on how to paint clouds better, thinking that might be all I required. At the same time that I was looking at clouds I was also looking at other parts of the scenery in some pictures that I had taken. I realized that on the prairies I would most likely only have to paint things about 3-4" high because the prairies are mostly flat. My other big fear was the painting of the 2 coulees, and a couple of low spots behind bridges where there are more angles and the need for perspective to give depth. I knew this would be difficult. I watched You Tube videos, got a couple of books from the library and looked at hundreds of pictures that I had taken or saved from the internet. My confidence grew as I bought brushes and acrylic paint in colours that I learned I would need. My daughters small easel worked well to hold inexpensive Bristol board, which I used to practice painting landscapes on.
By early 2016 I had considered more work arounds, I thought if I planted lots of trees against the back drop I would not have to paint anymore. So I amassed some trees and started planting them to give it a try. I soon discovered that this was going to take up a lot of space and in one spot I have a shelf that is only 4 1/2" wide and the trees would infringe on the track. Agh.... In Nov 2016 I started painting some better clouds. Which I was happy enough with and it was not really that difficult once I got going.

The next big move was to paint landscape, so I started with the hardest first, in the furthest part of the layout, which is slightly behind the TV where the track goes through the wall. That went well and then I moved on up the line to the first coulee. Now if I had done this earlier I would not have had to work around the bridge but this also went well. As I was going along I would fluke in to some shading and gain some more understanding. Oh... the hole in the wall to staging is just the other side of the last telegraph pole. The rest of the painting in all of the following pictures was done between Dec 2016 and Mar 2017


Next I decided to go to work behind the town, the farm and another coulee behind my wood trestle. I needed to finish this section as this was going to be the area that I was going to use for my NMRA Scenery AP. I was still learning little things as I went along. I stay away from detail mostly because it is one thing to paint using an easel, right in front of you, and another having to reach back to the wall. These next pictures show the painting as it progressed, not the finished scene.

The seam you see in the middle of this picture is how I did my corners. They are all curved by gluing Bristol board on to the wall in a curve into the corner. This worked really well and has stood up for 11 years so far. When you see it in person you really don't see the seam. Thus I have no 90* corners.


This next video is of the completed scene from the town to the farm.
So this is what I have learned through this process.
-that I wish I had not put this off for so long
-in the end it was no more scary than when I installed my first decoder back in 2006
-it took about the same amount of research as I put in to the detailing of cars and engines
-you really only need a few brushes and not that may colours of paints (12)
-I have to be in the mood to do it, but this applies to lots of things for me. If I am in the mood it usually goes easy. This is maybe a little more intense since you have to engage your artistic side.
-none of this painting will equal that of Max Jacquard's but then my whole layout is not museum quality either, so that's ok.
-I now paint a short piece and then do most of the scenery in front. This way it will look different as you go along and you have time to think about it.
-I never weather more that 1 or 2 cars at a time or they start to look the same and can be affected just by the mood I am in.
-the point in having the backdrop is not to steal the show but to give depth and to enhance the foreground.
This is a picture of the narrow shelf that I was talking about before. I just finished this last week. I apologize for the shadows, it is a tough place to take a picture from and yes there is plexiglas on the front edge.


I hope you enjoyed this post. Any questions you can email me or add a comment.
Subscribe to:
Comments (Atom)