Wood Rectangular

Behind the main door were 1"x6' or 2"x6' or 8' boards just slightly wider than the door. They slide down a slot and filled the doorway space. One or 2 of these boards had cuts in them to create a small opening. This opening had another board on it that also slid in a slot and could then be opened to let the grain run out. As the level by the door came down you would remove these boards until you got down to the opening then you would shove the auger into the bin. The grain running out the opening could be fed into a small hopper or into a hole that was dug into the ground. There was one other note to this description- the ambient temperature was either + 30C or - 30C doing this job and the combine or the grain elevator were filling so don't dawdle!
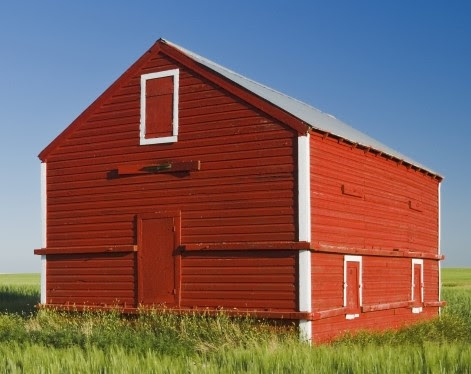
This picture shows a bin in good shape of a slightly different style with the side doors. The bar above the door is most likely old grader blade used to tie a cable through to the other end with another piece of blade there.
Here are the bins I have built. I intend to build one with all the interior details.


Steel Bins
The late 1950's saw steel bins becoming more popular and began replacing the many wood rectangular grain bins that had been used. Wood bins would still remain in service until the 80's with some still used today. The steel bins pictured here are Rix N scale bins that scale out really well. They come out 14' D and the ribs in the sheets are very close to HO. With these bins you can model 1350-1950 bushel Westeel or Rosco bins. In circa 1959 the two companies had not yet merged. You could also use them for more modern Westeel-Rosco bins. See the history of Westeel-Rosco here Westeel History You could also model Butler steel bins see their history here Butler. These are the companies that I am used to seeing in mass. There are newer companies that do not fit my era.
You can change the capacity of the bins by how many rows of rings you use.
4 rings = 1350bus
5 rings = 1650bus
6 rings = 1950bus
I have wood floors and concrete floors. For the wood floors I used scribed styrene .04 with .06 scribe to represent 2 layers of 2x6 planks, with either 4x4 or 6x4 skids under the floor. For concrete I used .08 plain sheet styrene with my bin sitting on top of the concrete. The other way was to have the bin sitting on supports and the floor poured with the bin in the concreate. In all cases wood or concrete types you would most likely see tar applied to the bottom ring where it meets the concrete to help keep moisture out of the bin. This detail can be just painted on with black craft paint as it is a little thicker. I chose to make my own doors out of .01 styrene with a backer made out of flat .02 styrene so they stand off the wall. This is far easier than trying to make a frame out of a strip. If the door was open you would see steel frames that drop down just like a wood bin. One of the panels would have a 6-10" hole cut in it with a pipe that extended back into the bin at a ~30 degree angle down. All you had to do was open the door and push the auger in. Pushing or pulling that auger by yourself sounds a lot easier then it really was because any change to level ground and you really had to tug to get the wheels over. The other design was a frame around one of the panels that went back in at the same slope. Again as the grain stopped running to the auger you would pull the auger out, take out the slats, push the auger back in and let the shoveling begin. You would end up shoveling about 600 bus. I added some wire to the left side of the door to look like hinges and a door handle on the other side. The roof cap on mine is painted yellow which is not wrong but I really don't know when they started painting them yellow so I may end up going back and painting them a steel colour. I seem to find missing details once I have things built.
This is a Rosco bin before the merger of West Steel and Rosco. The next 3 bins are all 1300 bus
 |


Here are pictures of my Butler and Rosco 1300 bus bins that are made from N scale bins from Rix. The ribs are more realistic than HO scale bins. The decals are custom made.

Here is a 2700 bus Rix bin that I have not decaled yet. It has a concrete floor. Wall stiffeners, door and roof hatch were added. It was then painted aluminum to look like galvanized steel. The leg is also scratch built, I have a motor that will go on the platform at the top. The piping between the leg and the roof of the bin is built but I am not going to add it until the scene is almost done. Right now everything needs to be able to be moved. You can also see the cover on the unloading pit.
Round Plywood 1200bus

My Dad had 3 of these bins that we had in service until the late 80's. The bins were built on the cheap to get extra storage as opposed to buying steel. They are constructed out of plywood and 2x4 studs, with strips of plywood over the seams and some metal strapping around the outside. Considering their simple design many lasted for years and you can easily find pictures of them on the Internet. The down side to this design was that the door was small so they were harder to get in and out of especially with an auger in the way.
The trade off was there is no need for all the crossing steel rods or wire to support their wooden walls leaving you with an open interior.
My bins are built from styrene and 2"OD tube. I drew out the roof a few times in CAD changing the width of the cut out needed to curve the roof. Once I got the paper one to work I built one out of styrene. I found I had to drill the hole in the center of the roof first and then cut out the other piece to be able to work it so that it curved. I now have a few different sizes saved in CAD. Thin strips of wood are laid over the plywood joints on the wall and roof. For the metal strapping I used pieces of tape that are cut and glued on the walls. The floors were almost always made from wood with 4x6 skids under the floor. The roof cap is made by cutting a circle out of tinfoil. If you do not have have a 2" tube you will have to cut the walls out of sheet. You need to figure out the length of sheet needed for the wall - you use the calculation D x Pi which gives the circumference and then what ever height you want the wall to be (most common size would be 8') .
Here are some pictures of the ones I have built. The grain auger is also scratch built.

This is the last type of bin I will talk about. It really doesn't fit my era and became more common from the 60's onward.
These bins are the easiest to model. Take a set of rings and glue one course together and set it on the ground. Done! You could also take some .01sheet styrene and cut it 4' wide and long enough for your ring. Scribe some lines at 8' so it looks like a sheet of plywood. Give it some wood grain texture with sand paper. Add some fence posts on the outside to support the plywood and a little strapping so it can't bulge out. During the 60's there were many problems moving grain to port with elevators remaining full as well as bins on farms! These cheap rings were viewed as better than just piling grain on the ground as there may be less spoilage. There was still spoiled grain that was next to the ground but less so. During these times our 3 sheet curling rink in Abernethy was built and paid for as it was used to store grain in for a time. The grain was not always covered in the 60's. The one pictured below is quite large.

Hopper Bin
This next bin is not of my era but I wanted to build one anyway. This is an all steel hopper bin made by many different companies. They were originally produced to hold bulk fertilizer and had a lining sprayed on the inside so the bin would not rust. It took me a while to figure out the roof and the cone for this bin. It was built back in the mid 90's. It would hold about 2000 bus and was 14' D. I have not painted it yet. You can also buy just the cone and put one of the above metal bins on top of the cone.

Here is a picture of the real thing.

You could also place a regular grain bin on a hopper cone

Hope you enjoyed the bin tour.
No comments:
Post a Comment