Monday, 25 February 2019

Grain Elevators part 3

Here are some pictures of the completed National elevator. That leaves only 5 more to finish. The office for this elevator is beside the elevator because of a lack of space on my layout. It is not a common position in Western Canada but did appear. You will get to see it better installed pictures in a future post on the scenery for Waldron. You can just make out the lighting rod above the roof hatch. There will be an annex that will go on the other side and will be done in the next month or so.


Here you can see the Rear of the Ford 1 Ton on the lift. The decals are custom made. The driveway in to this elevator is at ground level because of the depth of the cut that the tracks run through. This was not very common but did occur. The small door at the bottom of the wall leads to a small walkway between the bins on the inside.

In this picture you can see the front of the Ford 1 Ton that is on the lift. The pipe coming out the side is for loading grain in to a truck outdoors. Could be clean grain or screenings from the cleaner floor.

Shows the driveway floor and the outline for the scale. The edge of the scale usually has a piece of belting to fill the gap between it and the main floor. The grating over the pit was done with scale 1"x2" glued in on edge. There is a pit under the grating .You can also see the beam for the scale

This show the cleaning floor. Maybe some day I will get around to detailing this floor but I would first have figure out how to build a Carter Day 245 and disk cleaners. Maybe a larger fanning mill. There would have normally been stairs going up to the cleaning floor but because I have cut this elevator down to 35' the stairs would have been to steep, so the ladder was installed.

This shows the back leg and hopper along with the chutes coming from the bins.


Shows the truck hoist in the raised position without the truck on it. The LED is mounted between the floor joist on the cleaning floor. The pipe that is tied up is for loading trucks.

A look at the black board shows that most of the bins have grain in them. The tool between shovel and the broom is a flat piece of metal with a handel welded to it and is used to clean out the corners of the truck box without having to reach over the back of the truck with a shovel. You would just go through the tailgate and pull out the grain.

Here is look inside the office. The agent is helping the farmer fill in his permit book for 1959. That is the LED in the corner by the door. Everything in the office is scratch built.


Thursday, 21 February 2019

CNR 150T Coal Tower

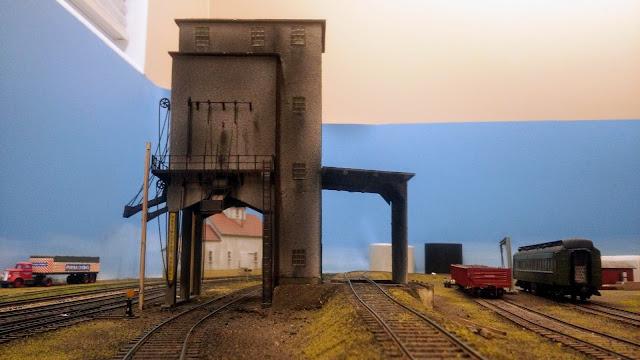
I scratch built this from CNR plans with modeller liberties.These plans came in a bundle from the CN Lines. I drew up the tower on my Cad program. I draw in Cad at 1:1 and then I printed it off at scale. See How I scratch build At the time there were no kits or plans for wood towers for CN coal towers that I could find. There was a nice kit made by Kanamodels although they have closed their business. I do not have any pictures during construction as I didn't take many of those pictures back when I was building this structure.
This is built from styrene except for the wood retaining wall. This dock is at the end of it's life and will be retired in 2 more years with the end of steam.


This is a view looking back from the ash pit on the west side of the yard.

The CNR plans were for a 300 ton 3 track plant. When I drew it up I cut it down to only 150 ton with two tracks because of space restrictions. In the plan there would have been 2 tracks going underneath the tower. The model is built from styrene sheet and some wood 12x12 beams on the roof of the unloading shed and the retaining wall. There are also steel supports that hold the beams in the roof in place.The stucco is made using the same methods as I used for the 2nd class station. The rooftops are sandpaper representing a tarred roof. The doors, windows,walkway railings, chain drives and coal chutes are Tichy. The windows were reworked a bit to be more accurate for CN. There are little cleats on the concrete pillars to tie back the chains. The unloading grating was built from some screen that I had around and I added 2"x12" planks to it so workers could walk on it to open chutes on the cars. The upper walkway grating is from Plano and the chain is from A-line. There is a light in the unloading bay and on the poles at the outside corners of the walkways using SMD LEDs. The track to the unloading bay and under the tower is code 55. The rail on the outside chutes is code 70 same as in the yard tracks. I then did weathering on it using my air brush and chalks. Not really too tough a build except for getting slops on the hoppers right on the bottom of the tower and the unloading hopper. The structure was formed from .04 plain styrene and some tubing for the hopper concrete posts. The raised ground level for the pit was made using foam insulation. This model has to be movable so that I can access the track work behind it if repairs are necessary. I have not yet completed the scenery behind it including painting the backdrop. This view shows the unloading pit. There are planks 2"x12" that are movable for the workers to walk on to get out to open chutes on the hopper cars and the grating spacing is closer on the left side. There is also a pit under the grating.
  

This is looking at the entrance to unloading from the east. The rise from grade to pit level is 5'. The unloading track then starts to descend to the ash pit which is just behind the top of the passenger car. There is room to unload 4 cars at a time. The cars are not spotted because of the grade, it is easier for the yard crew just to dump the cars while still coupled to a locomotive. There are yellow height restriction signs on the support leg on the left. There are also signs further out on the approach track that passes the left side of the tower. There had already been one incident of a transformer on a flat car taking out the side chutes.


This shows the back side. This picture is very difficult to get when it is in place on the layout. The chutes will go up and down but I do not move them very often as they are very delicate


This shows the night lighting


Any questions my email is on the about me page.
  

Wednesday, 13 February 2019

CN Water Tower

I just finished this CN Water tower. It is scratch built from styrene. I used plans from CN Lines along with some notes and pictures that I have found. the windows, water level indicator and chimney were what I used from a Kanamodels kit I got at the swap meet. Someone had tried to built it so most of the parts were not usable. This octagon was a tougher build than I thought it would be. I drew it out in CAD and still had to make adjustments to wall width a couple of times. I had to develop a plan to get them all together to see if the would work out to the right width in the end. The roof worked out better but there is a little more latitude to the roof for some room for error. The one thing that I never did check was the height of the water pipe when it was in the down position. On the OH-SHOW-ME drawing it said it should be 10' above the rail. I knew how high my road bed and rail is so I added that and built away. What I should have check was how high some of my Vandi tenders are. So in the end it will sit on a small hill to gain the 40" needed to fill a 4-8-2. These buildings are like grain elevators when you start looking at pictures there doesn't seem to be 2 exactly the same. The walls are .04"x.06" spaced Evergreen siding. The windows are salvaged from the kit and the door is scratch built. The level gauge and chimney were also salvaged from the kit and everything else is my own material. I did add the plastic window material with the mullions painted on but I think I will take them off as most of the windows that broke over time were changed to just plain single sheets of glass. Less maintenance and cheaper. This water tower lives in Atwater on the layout.

This shows the base and walls once it was glued together.

This picture shows the walls and the bracing for the water spout. I added bolts to the bracing.It is masked because the foundation has been painted already.
A closer look at the bracing for the water spout. In the end the bracing should have been moved up to one board below the window. Then I would have had to only add 20" of fill under the base of the tank.
Here it is withe the painting (CN red #11) done and the windows installed.and the door finished. I use Catwisker yellow for all my CN cream colour.
Here is the completed model with the tar paper roof and fascia boards installed The tar paper is just masking tape and the fascia is scale 1"x6" styrene. There was 1'x8" and 1"x6" used on the door. The foundation is from Styrene strip. The water spout was also salvaged from the kit.

I will add a picture of the tower in place once the scenery at Atwater progresses.