Friday, 25 October 2019
CN Lime Stone Hoppers and Loads
Tuesday, 24 September 2019
Making molds part 1
Monday, 19 August 2019
CNR (GTP) E Class Station
This shows the floor with the board texture glued to it. Also shown are the bay walls in the middle and a window installed on the entrance wall.
T he picture below shows a better view of the floor with the flooring glued to it, this was something that I had tried a few years back on the deck on a flat car but the textures you can find now are so much better. I imported the texture in to Inkscape and then scaled it and copied and attached panels together so it was long and wide enough to cover the floor. I then printed it out. Next I sprayed the floor with 3M glue laid down the sheet getting a leading edge straight. Once this was dry I flipped it over and out off the excess. This picture also shows the window sashes on the left. Under those are the window sills and trim. The green coloured parts on the bottom right are door trim and treads and trim for single pain windows. Up beside my tweezers is the 5 panel door without the panels in place. The brown curved piece in the middle right is the top of the desk that goes around the inside of the bay walls and just above that are the sashes for a single window. The yellow parts at the top are the roof panels before they are glued to the main roof. The main roof has been glued together and the sheet of paper with the shingle lines printed on it is glued to it. The green thing at the top is the top of a glad zip lock bag that holds some of the window and door parts.
Here the main roof is all together and I am shingling. Three sides are done. The lined paper is created in Cad to fit a letter sized page. The lines are the same spacing that Campbell uses on the their card stock roof panels. I then spray the roof with 3M and attach the paper. The eve roof panels had the paper applied before I glued them to the main roof. I do not normally do shingles at my desk but on this smaller table that is in front of the TV. I finished the whole roof during the 3rd round of the Masters.
This shows the roof for the kitchen shingled and the ridge cap on. It also shows the shingles on the sheet of wax paper to the left. The wax paper was tapped to a sheet of lined paper and rows of shingles were applied. A book was placed on top to keep them flat. You just cut off a strip about 1/4" wide, remove the wax paper and bend them in the middle with a straight edge and a knife. With this angle they fit the roof nicely. You can also see that the doors and windows have been installed. And the glass is installed in the doors and windows - which is spread white glue. The trim between the 2 types of sidings has been added.
This shows the completed main roof with the ridge caps on.
Next the shingles were painted red, then the chimneys were added and everything was weathered and then dull coated. The train order board has been added to the left of the window. It is taken from a picture I have of a real CN train order board that has been scaled, printed and glued on. Once all the trim was on the bottom board of the building was weathered and dull coated. Then the roofs were installed and the flashing was added. The chimneys were made by gluing brick texture printed paper to a piece of wood that has been cut and a hole was drilled in the end. They were then glued to the roof.
This shows what the interior looks like with a bed in the bedroom. The agent helping a customer at the counter and some people sitting in the waiting room. The tabs on the front wall hanging over are for the outside lights under the eves. There is an interior light bracket that extends from the tall wall to just over the heads of the people at the counter. The kitchen is at the back and the living room is to the left of the office. You can also see the desk that is attached to the bay wall.
This picture shows the Ensign flag which was printed from a picture I found and scaled down and glued to the flag pole. It is just mounted on the platform for this picture when the building is placed it will be in the ground. You can also see the scratch built semaphore that I built. The blades are movable by hand. It does need a ladder. The other detail in this picture is the power connection through the roof and the meter on the wall below. The platform has been painted to resemble aged wood using the process http://www.pacificcoastairlinerr.com/rough_weathered_plastic/ . The green is CN #12 Floquil (this is not the same as the green #11 that is used on CN locomotives) and the cream is Cat Whisker Yellow from Poly Scale.
This shows the back side of the structure showing one of the windows in the freight room partly open.
Placing the station on the layout at Waldron will be covered in the next post on scenery at Waldron
Sunday, 5 May 2019
Cool Tricks part 1
In the 2nd week in April I was invited by Rob Badmington to come down to Calgary and he would arrange for me to be able to tour some layouts... four in fact. When I was at Rob's I asked him how he painted the vehicles on the road in the photo above and his response was he had not painted them but used the process he describes below. They look just as good in person as they do in the picture. The one thing he did not point out in his description was that the truck at the front in the picture above and the truck on the right in the picture below, was that he placed an extra piece of this card stock behind them that just moves them off the backdrop and gives them an ever greater 3D effect. I have used printed pictures a lot for signs, window curtains, textures for walls and floors and building interiors but had never thought of using this trick before.
This is Rob's description of how he did it. He begins the process with photos. " I painted a road on the backdrop to blend with a 3D road on the layout - see the picture above and the picture below. For the record, I used Google Street View to provide an image of what I wanted on the backdrop and painted it myself. From the ( third picture) I used various vehicles captured by Street View and printed them out in a appropriate size, cut them out and then glued them on the backdrop. In the other picture, I used a Street View image from the South Fraser Perimeter Road (4th picture) to give me an idea of what to paint, and again used cut out vehicles to fill the road."
So give it a try... play with it a bit and see what you can make happen. If you use a program like Inkscape which is free, the scaling is really very easy with just a small leaning curve. For era's before Google Street there are main street pictures that you can find and do the same trick with. To stick them to the backdrop just use a kids glue stick and if you do not like it you can just wet it and remove it with out hurting your paint.
Rob has another cool device he created that I will cover in another post.
Sunday, 28 April 2019
Sask Pool Livestock Pens
I just finished this structure. It was built from styrene and my own drwings from memory. There is about 80-90 hrs in to it from the start of the drawing process. The loading can accommodate 2 36' stock cars at the same time. As a Sask Pool facility it would have normally been on the same track as the elevator but because of space I placed it at the east end of the yard opposite the loading platform.
The picture below shows part of the drawing showing spacing and position of the posts.
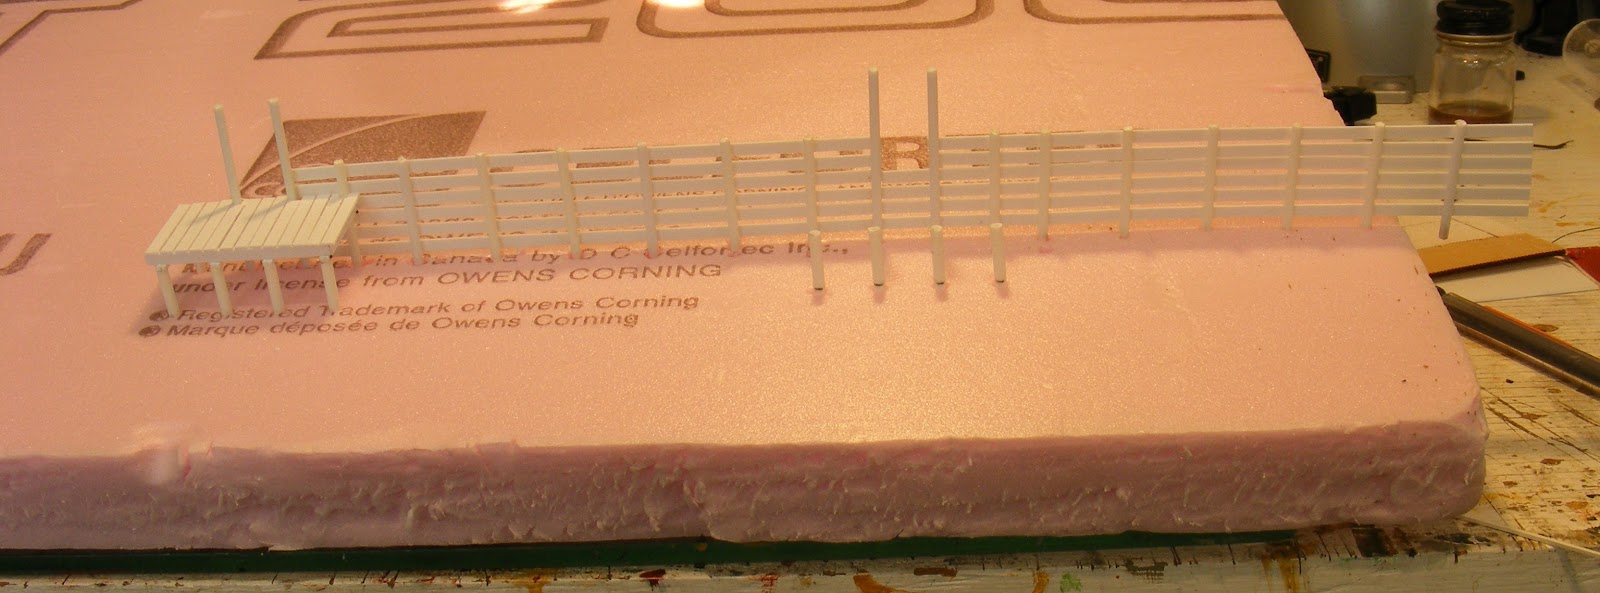
This shows the whole drawing. I had to punch in all the post holes for the front fence and loading platform into this piece of foam on my bench because the loading platforms had to be built in the standing position. I then used the same drawing to punch the post holes in the layout. OH... to make the holes in that nasty foam!! I first punch them with a compass that I have because it has a sharp point and then with a piece of pointed dowelling to make the hole big enough to get the post in without too much fighting. All the posts are 6" except for the ones on the front to the loading platform which are 8" so the 4x4" stringers to sit on.
This is the pattern I used to make the sides of the chutes and the associated fence going back. I also used the pattern on the right to make all the gates from. You also get to see one view of how the loading platform goes together. The picture is shinny in the middle because I put glue from a kids glue stick on the paper to hold the posts in place while I attach the the 2x10" boards. The hole in the top is where the pattern for the loading chute floor was.
This is the pattern I used to make most of the fences as the post spacing is the same for just about all of them. Again it is shinny from the glue. I just add a little more glue each time I make a different fence and when it is done you can peal it off without tearing the paper. I go through a lot of paper for any build I am doing.
You can see the completed platform on the left and the one in progress on the right. You can also see the marks on the front 4 posts that shows ground level.
Here I have added the stringers from the sides of the back posts to the top of the front posts forming a V. Then the joists are placed on top of the stringers. Once that is complete the top boards were added. Once this was done it was painted and weathered and moved to the layout. Each section of fence was built at the bench and moved to the layout and then glued together in the corners on the layout. This type of build had it's challenges.
All the gates are movable and the slides in the loading gates also slide back and forth. For the gate hindges I used eye bolts and a bent piece of wire for the eye to slide on to. The piece leaning up against the gate is the spacer that goes between the platform and the car.
Each board (2x10") was cut and then glued on. Once glued, nail marks were added in the board against each post. Even the gates have all the nail marks. They were then airbrushed white, weathered with either paints of chalks. This facility only has maybe 4 years of life left.
Here you can see the portable truck unloading chute that can be moved into place if a larger truck needs to be unloaded. Next to the chute there is a hydrant and hose for watering animals.
The feed troughs were made by cutting styrene 1/2" tubing in half. Ends were added to these pieces and then angle iron legs were added. The water troughs are made from 1/4" styrene tubing, painted , weathered and then had water added to them using white glue. Because this was a local facility it was the farmers responcibility to feed and water his own animals.
A 36' stockcar was able to hold 10 cows. The first pen on the left will hold 20 cows, the middle pen will hold 13 and the last pen will hold about 8 but is really for small stock like sheep and pigs. As I was adding the scenic material to the pens I used a horse and a cow to stomp them around to make the marks in the dirt before it dried.