Today I had to glue up some more insulators for my scratch built power poles. So I thought I would take some pictures. I start out with insulators from Tichy part #8158. I cut them from the sprue and run a drill bit though the hole to make sure that is clear. Then cut out each one from the the group they are in making sure to cut on the flat side of each to leave the domed top that the wire would attach to.
I then take a .015 wire put bend in the end and then start sliding the insulator on to the wire all facing the same way. Once they are all on I put a bend in the other end of the wire. Now they are all locked on to the wire and can't go flying across the room. I now side them out and space them and then go along and give each one with a shot of CA. Once that is set I can cut off how many I need to add to the poles. The extra can just stay on the wire. I leave enough wire attached to the insulator so I can attach it to the pole.
I have not installed the brases to support the 4x4 yet
Saturday, 25 November 2017
TV Antena
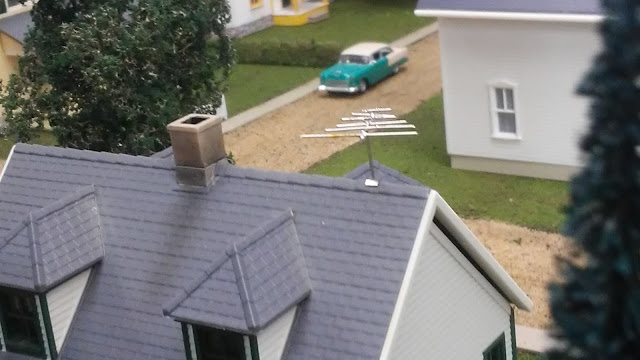
Today I built couple of TV antenna's for some of the people in town that have bought TV's.
I tried first gluing the arms to the center piece with CA but as per usual CA only works when it wants to...fail. I then decided to just solder them all together which really worked much better. I put some resin flux on the center piece and tinned it, then tinned the 6 arms that attach to the center. Gave them a touch with the iron and they attached easily. You can only add heat for a couple of seconds or the others ones will come loose. No need to paint as this is a natural colour. The wire is .015 and the pole is .02. You can see from the picture the other patterns I drew out. The patterns are sitting under the glass on my desk. This antenna is scale 5' long. I then took the house drilled a hole on the roof. Before I installed the antenna I cut a small piece 1ft sq out of tin foil and slid that up the stand to act as a mounting base of the antenna. It is just from memory, I know there could be guy wires but that would be just to pidly for the effect I wanted.
I think it looks pretty good. I had to really zoom in so you could see it. When looking at it from a couple of feet away it is hard to tell any of the arms are bent at all. I will give 4 or 5 out of my 11 houses some form of these. It is hard to find how many people would have had TV in 1959 in Sask. and that is when I was born so no memory there. The first one took 75min but any of the next ones now would only take about 15 or so. It is a nice quick little project.
Wednesday, 15 November 2017
CNR Ice House
CNR Ice House
I scratch built this from CNR plans that came in a bundle from the CN Lines. I use this process to layout and cut the building see this post. How I build all my scratch projects
I modeled a 500 ton version because of the space I had, but you could go bigger if you wanted, the plans were for a 1000 T. The ladders and doors are scratch built, the windows and hinges are Tichy. The roof is 80 grit sandpaper airbrushed black and glued on with Lepage Pres-tite spray adhesive. Which is a very good glue and you only get one chance to lay the paper. I cut the roofing paper just a little larger than the roof and trimmed off the excess once the glue had set and then added the fascia boards. You do not have to be as fussy laying the paper in this way. The siding is from Evergreen along with the other parts. The cement piles are just .08 styrene rod painted with Delta Ceramcoat mudstone craft paint that I use for concrete, they are then planted in the foam scenery to match up with the above timbers. The sling track that comes out the end under the peak is code 55 rail. I air brushed the building CN #11 box car red. The doors are painted yellow using Polyscale cat whisker yellow which seems to be close to the CN cream yellow colour. I then weathered it with some chalks and then sprayed it with a mat finish.
Sunday, 12 November 2017
Uncoupling tool holder
I have been asked a few times how I made the uncoupling tool holder. It is made out 1/2" PVC tube 3 1/2" long. My picks are 4 1/2" to 5 1/2" long. On the bottom I cut out and glued on a piece of styrene. Once that was dry I filed it down to the edge of the tube. I then took the tubes and the 1/2" pipe holders out to the garage and painted them gloss black. Once they were dry I installed them throughout the layout where switching takes place. They will hold about 10 picks each. When I am taking photos I pull the picks so they do not get in the way of the shots.
Saturday, 11 November 2017
How I build all my scratch projects
I draw up my projects on my Cad program. I draw in Cad with actual dimensions and then I print it off at scale.By doing this you never have to convert to scale, the program does it for you. I then cut out the outside edges of the drawing for each wall, floor,interior walls, roof panels,doors and glue it to sheet styrene with a glue stick ( if it is a small part I do not cut close to the lines ). Now I cut out the styrene along the the printed lines cutting out the window and door openings along with the outside edge of the wall. Remember your orientation to scribed siding because you are gluing the drawing to the backside. Using this process means that I never have to measure, just cut on the lines. Because I have this saved on Cad I can go back and print out as many projects as I want. There are free versions of AutoCAD and learning to draw in 2D is reasonably straight forward (you could learn a lot over a weekend). LibraCAD is a good choice. The kids glue stick glue is water soluble and so I just place each part in water and the paper just floats off. Wash with a little soap and the part is ready to paint. If you are working with wood you should first cover it with a sealer so the paper will come off. Cover both sides so the piece will not warp. Use a wet cloth and dab the paper, once it is wet enough you can rub it off. Practice on a scrape first. Start your first project with something easy like a box with a roof. The quality of the drawings below is not great because I had to save them as a picture so I could post them here. I do not add every detail but you get the idea from from the pictures how I would be able to cut out the walls roof panels, floor, ect. It also gave me the positioning for the 2x6's under the platform on the ice house and were the doors should be placed, On the horse car you also get the position of the grabs so I would drill the holes for them after I have cut out the sides. Again I never have to measure. The drawings you see below are what I see on my screen in the program. the program will size the drawing so that it will fit on the screen, when I go to print it I set it to print the drawing at 1:87 and you will see a print preview to see what will fit like on a page and maybe you will have to print it on 2 pages to get it to fit.
Using your smart phone with Digitrax
I had my phone hooked up to my layout yesterday Engine Driver/JMRI/Digitrax simplex and it worked better. Before there always seemed to be a problem that it would not always take a direction change, especially if you were switching and going back and forth a lot. The problem is with the Digitrax command station.The Digitrax command station can't be fixed. The Fix??? Well on our trip to Lethbridge Peter was telling me that if it will not take a change in direction you can press any function button F0-F4 which will send the packet as they are part of the same packet as direction. The command to change was always there it just didn't get sent????? This issue affects all types of throttles. This would have been nice if Digitrax had disclosed this years ago even if there was not an ability to correct the firmware.
I really like to use the phone as it is easier and more intuitive for new operators. I have also gathered a couple of old phones from the kids, cheap throttles.
If you go into roster in JMRI you can go to Labels and Media in the bottom right corner. Once you have this open you can add the description for each function that your decoder has. When you load the engine to your phone only the function you have on the list will appear. You need to set the preference on the phone to use labels from the roster. If there is a function that you do not want use you just leave it blank in JMRI labels and then it will then not show up. Hope you find this use full.
Thursday, 9 November 2017
Looking for roundhouse drawings
I am looking for drawings of a CNR roundhouse preferably in the west 3-8 stalls so I can scratch build one. Thanks to Warren and Norm for supplying drawings for me. This works really good :-)
Subscribe to:
Posts (Atom)